If you spend enough time on the tracks, you’ll need to replace your caravan’s shocks sooner or later. Happily, it’s super easy to do.
Essentially, shock absorbers do two things. Firstly, they absorb the shock, jarring and strain that comes from travelling over rugged terrain, potholes, and those unexpected dips that you inadvertently hit too fast. They ensure we have a smooth ride, reducing the vibration fatigue on your caravan’s parts and fittings, and preventing damage to the things we pack inside.
Secondly, and perhaps more importantly, shock absorbers keep your tyres in contact with the ground at all times by controlling the springs. Any time a tyre's contact with the ground is broken or reduced, your ability to drive, steer and brake is severely compromised.
Like all man-made things that move, shockies will fail eventually. Under normal conditions, shockies stop functioning perfectly within around five years, but they can fail sooner if exposed to more vigorous use.
It’s quite easy to tell when you need to replace your shockies as one of them will be leaking oil, so you’ll be able to see the dust and road grime of your most recent adventure stuck all over it. If you’re conducting regular maintenance parades, you’ll pick up this issue early. Be complacent, and you place your rig, and your travel party at risk out on the roads.
STEP ONE: MAKE AND MODEL
It’s not a case of one size fits all. If you plan to order your replacement shockies via the internet or from your local specialist, you’ll need to get on all fours to find the part number embossed/stamped onto the body of the old shock absorber.
For caravans with a low clearance, you’ll need to remove a wheel. Otherwise, it shouldn’t require more than a simple crawl around. If you start having difficulty, it may be because some generic imports don’t make the number obvious or display it at all. In this case, you’ll need to determine the closed length, open length and diameter of your shockie, compare and contrast it with what’s on the market, and make a suitable match. If in doubt, consult a specialist as guessing won’t get you what you need.
STEP TWO: SAFETY, SAFETY, SAFETY
Hope for the best but plan for the worst. Mistakes happen so don’t temp fate. Chock your wheels and deploy all stabilising legs before you get your hands on the tools.
STEP THREE: TOOLS UP
Believe it or not, the shifter and the spanner (or a socket wrench if you prefer) tools are all you’ll need to remove and replace a set of shock absorbers — but note the inclusion of the ‘defrustration-ometer’ and the ‘pry-open-omatic’, as they may come in handy too.
The fact is the last person who fitted shockies to your caravan was probably a mechanic in a workshop. So, they’d have used an air/pneumatic impact wrench, and it’s possible their efforts have pinched the bracket inwards. If so, you may need to apply a gentle tap or use the rigger’s wrench to pry open the bracket to fit the new shock.
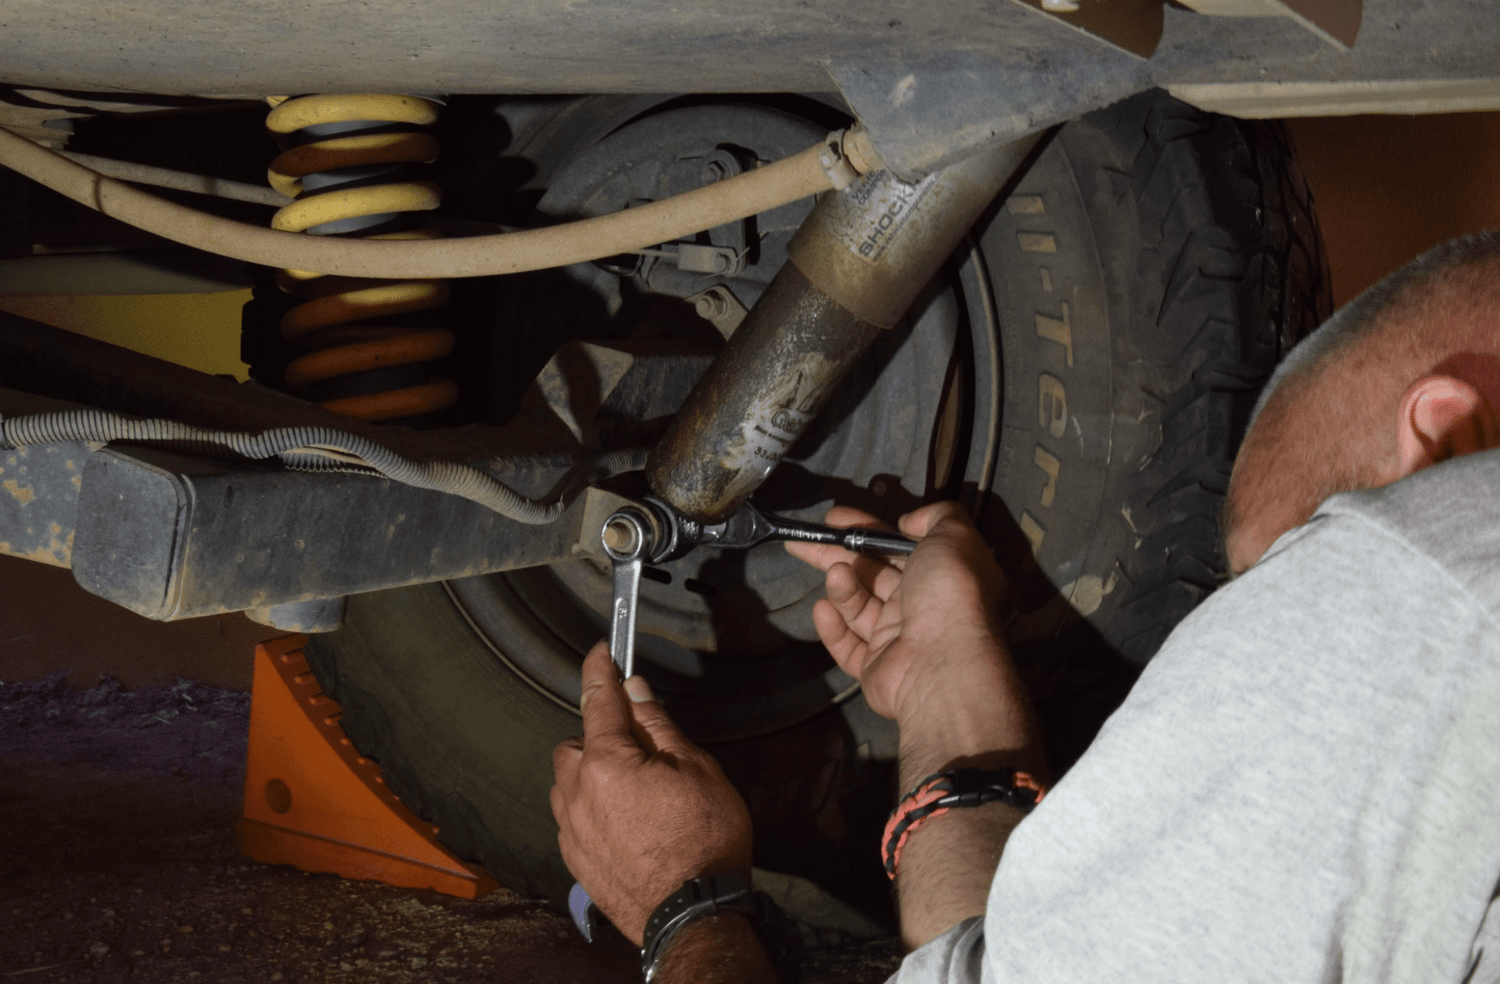
STEP FOUR: BOTTOM FIRST
First, remove the bolt from the bottom bracket and eye of your old shockie and repeat the process on the top mount. By undoing the top mount first, the thing may drop on your head or get in the way when undoing the bottom mount. In this example, the top mount was a spindle mount (not a bracket mount) so the decision was made for us.
STEP FIVE: MURPHY’S LAW
As we went to fit our new shocks, we noticed something wasn’t quite right — the top bushing would not fit the spindle. For reasons known only to the caravan manufacturer, they’d fitted a spindle of a different size to the bushing.
Inspecting the removed shockie, it was clear someone had removed the bonded collar to make the old one fit. Not wanting to take any chances, we got professional advice and guidance from Capital Steering and Suspension. After a chat and some collective scratching of heads, we opted to replace the entire bushing on the new shockie with a part from Super Pro rather than risking damage to the fitted bushing.
Hopefully you won’t have to go through this step.
STEP SIX: LUBE UP
As with any moving part, friction and heat are created during use. So, to minimise wear and tear, and to ensure the smooth operation of the bushings, apply a purpose designed, environmentally friendly lubricant to your bushings collar, spindle and mount.
STEP SEVEN: BOLT ON
The last step is to bolt on your new shockies. For us, it was the top mount first due to the spindle. If one of your shocks blows, replace all of them as the others may be close to failing as well.
At the end of the job, clean up your work site and have a look for anything worth keeping, such as those spare bolts. Who knows when they’ll come in handy.