Creek crossings are easy — once you know how. But get it wrong and a trip of a lifetime could quickly turn into a world of debt. Our remote area specialist, Scott Heiman, shows us how to get it right — and it starts at home!
Of Australia’s 913,000 km of roadways, nearly 560,000 kms are unpaved. That’s over 60% of our road system. Within this network of sandy, muddy and dusty tracks, you’ll find causeways, dips and flood ways. So, what happens when a creek stands between you and those magical places you know are waiting on the other side?
The answer is to be prepared. Factors such as the depth of the water, flow rates and the quality of the underlying ground surface mean that every waterway is unique. And every driver and every rig will perform differently when their paths cross with one. Disregard of any of these inevitable variables, and it’s easy to become unstuck. Indeed, the consequences of failing to assess – and mitigate – the risks of creek crossings can be catastrophic.
So, what to do about it?
Step 1 — Up-Skilling
The first thing is to get back to basics. Let’s talk about driving skills. Like any other aptitude, driving skills are perishable. While you may get behind the wheel and hit the streets for your regular commute, driving on unsealed roads is different. And 4WDriving is still different again. So, imagine yourself on an overland trip — now towing your favourite ‘home away from home’. You’ve spent the morning on a mix of A-grade highways and B-grade byways, and the next minute you’re looking at a creek crossing, reaching for the gear stick to engage low range. What happens next is in your hands.
The range of skills required to undertake all these tasks competently doesn’t just ‘happen’. And it takes humility to recognise that we don’t know everything just because decades ago we passed our driving test as a teenager. Up-skilling is the key. And there are plenty of options available when it comes to 4WD training — including for those of us who tow. A trained provider can help you develop a kitbag of abilities and response options for a range of driving conditions. And don’t be mistaken in thinking that this type of training is only relevant to weekend warriors with a penchant for cavernous track ruts and nosebleed inducing gradients. Given the variable quality of Australian roads, it will help keep you, your family, and other road users safe when you inevitably find yourself off the black-top.
Step 2 – Prep Your Rig
At the point of purchase, your tow-tug comes with an ‘unprepared’ fording/wading height. So, check this in your user manual. The designated wading height simply tells you that no water will reach your door seals, and your radiator fan won’t be fouled by ingress of water into the engine bay. While the old-school ‘rule of thumb’ for a 4WD wading height was 500mm, modern rigs can have up to 700/800mm. This is due to improvements in door seals and greater thought being put into the engineering and placement of electronics and diff breathers. You can increase or mitigate your vehicle’s fording height by ‘preparing’ it ahead of a water crossing.
In its simplest form, this involves fitting a tarp or purpose-designed water bra/radiator blind over your bulbar. Doing this reduces the amount of water that will get into the engine bay. This will stop the rotors of your fan bending in the water and striking the radiator itself.
There are mechanical preparations that you can make too, but these happen before you leave home. For example, you could replace your plastic radiator fan with a metal one, making it less susceptible to bending. Spend some more money, and other options include a suspension upgrade or lift, increase the size of your tyres, fit a snorkel, have your diff breathers extended, and/or purchase an exhaust extension. A combination of any — or all — of these could potentially increase your fording height above a metre.
While it won’t increase your fording height, a useful trick is to fit your number plate to a piano hinge. This helps when water hits the radiator and surges into the back of the plate. Hinging the number plate will allow it to simply lift out of the way and will stop it from being bent or snapped off. Once you’ve crossed the water, the plate will simply drop back into place. That said, if you do stupid things like attempt to regulate your plate’s movement with strings or electrical devices, you’ll soon find yourself in hot water because it’s illegal.
The fording height of your caravan is another matter. While you should expect to easily ford at axle height, or perhaps even to the height of the tyre, immersing your rig above the bodyline is a different thing altogether. So, to know what your rig is capable of, ask the manufacturer. An ‘off-road caravan’ may offer you considerable versatility, but don’t expect much fording capability from a ‘normal’ caravan as the riding height is likely to be too low and the seams and seals inadequate for the job. High quality automotive seals on all doors and properly sealed seams are a must. Beyond this, the real threat is water ingress through vents and exhausts. You may need to gaffa tape these shut with the help of a garbage bag.
Step 3 — Get Out and Walk
Your front seat passenger (officially known as ‘co-driver’) has duties to perform. These include opening and closing gates, cleaning the windscreen at fuel stations and … getting out and walking across the creek before you drive across it.
The purpose is primarily to check the water depth. But the task also includes looking for potholes, logs, boulders and for places where a previous driver may have been bogged. You need to avoid these areas if they exist. It helps if your co-driver has a CB radio with them. That way they can point out the issues to the driver, at their actual location, which will go a long way towards helping the driver to pick a safe drive-line.
It’s important that you go through this ritual every time. Even if you crossed the same creek just a few days ago. Remember that rainfall can turn yesterday’s knee-deep creek into a raging river today. While the sun may be shining where you are, upstream 50kms in the catchment, it may have been raining cats and dogs all night. And this will change the creek conditions, including submerged obstacles.
From inside the vehicle, the driver can also double-check the water depth by observing how far the water reaches up the co-driver’s leg. For example, I know I can drive the Hilux through a creek ‘unprepared’ if the water reaches knee height on my co-driver, but if it reaches her hip-height it’s a metre and I know I’ll need a water bra and to prepare recovery gear for use in case of emergency. This is in case I stall mid-crossing.
If you’re towing, this is also the time to consider gaffer taping any door seals on the caravan/camper and to double-check that all camlocks are fully tightened.
Of course, the caveat to all of this is to take heed of your environment. Find yourself north of the Tropic of Capricorn, and crocodiles are a real and present danger. In areas such as Kimberley, Far North Queensland and the Top End, walking the creek crossings and/or rivers is not recommended.
So observe other vehicles crossing, and look for ripples in the water that may identify a rock underneath that you’ll want to avoid.
Step 4 – The Crossing
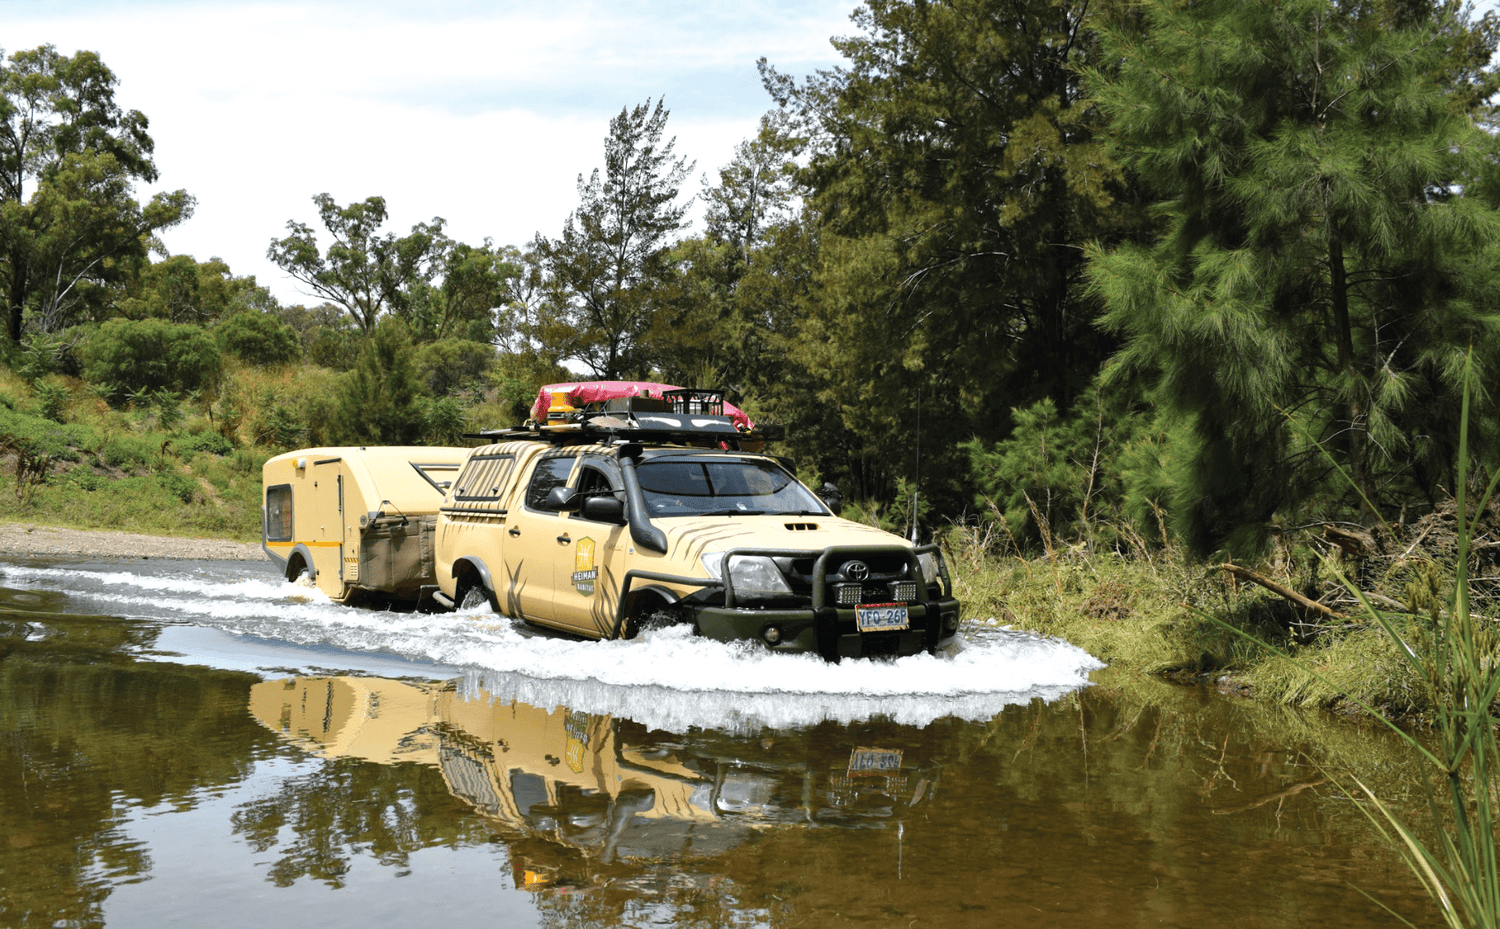
The first rule of creek crossings is that only one vehicle should be in the water at any one time. You don’t want to be the second vehicle when the car in front stalls because then you then have to stop too. This will increase your risk of water seepage, getting bogged or even swept away.
Next is to engage low range 4WDrive and second gear. Drive slowly across, maintaining speed and revs, and at a speed that will avoid water coming over the bonnet. What you want to create is a rolling bow wave in front of you and to keep up with it.
When driving across creeks, always have your window wound down (especially electronic ones) and unfasten your seatbelt. This gives you an avenue of exit if you stall as you don’t want to be opening the door. It also means you can escape the vehicle if you miscalculate the crossing and are swept away.
If your vehicle stalls in shallow water, try to restart the engine. If your vehicle stalls in high water — or if water has come over the bonnet causing the stall and you don’t have a snorkel — don’t attempt to start the car. This is because water may have gone into your cylinders, and you risk engine damage. Alternatively, you may have shorted out your ignition system and water is now getting into other engine and drive components. Conduct a recovery and call for a mechanic. Your electric winch may not work so best be recovered by another vehicle using their winch or a tow rope.
After completely exiting the crossing and reaching higher ground, stop and let the water drain from the vehicle - being on a slope will assist this process. Then test the brakes before getting back on your way. Besides, you have to take off the water bra so take the time to inspect if the fan has struck the radiator, and leave it idling for 10 minutes to let components dry.
While there’s a lot to consider before attempting a water crossing, as long as you prepare your vehicle and make a thorough assessment of the conditions before crossing, you shouldn’t have a problem.